Thursday, December 15, 2011

Stuffing OR dressing?

I never knew the difference between stuffing and dressing until a few weeks ago.  I just called it all stuffing.  I figured that calling stuffing "dressing" was an old person term.  Guess what...it's not!  The conversation came about when I was talking to my mom about her famous stuffing recipe, which I will be revealing in this very post.  It was the first time that I would be making it by myself for Thanksgiving, so I had her on the phone with a ton of questions.  Thankfully, she walked me through the whole thing.  Anyways, she kept correcting me when I would call it "stuffing".  It was getting annoying.  Then she told me why I was wrong.  It turns out, "stuffing"  is actually stuffed into the turkey.  "Dressing" is the same food as stuffing, but kept out of the turkey.  It makes sense now doesn't it?   So I ended up making "dressing".  I am kinda grossed out by "stuffing".

I made two different dressing recipes for Thanksgiving.  One of them was Italian Sausage Dressing from "Our Best Bites".  I have to be honest, I wasn't too thrilled with it.  I like my Mom's stuffing, excuse me, dressing recipe better.  Here it is!


Mom’s Turkey Dressing

(Makes enough for 15)

3 cubes of butter

1/2 c olive oil

4 or 5 sticks of celery

2 large sweet onions

1 large bundle of fresh parsley

3 12 oz boxes of seasoned cubed bread

1 can chicken broth (I use more)

Craisins (put in as much as you'd like)

black pepper to taste

1. Chop celery first and sauté it in a large pot with 3 cubes melted butter and ½
cup olive oil.
2. Chop parsley and onion while celery is cooking. When celery is soft, add
onion and parsley. Cook for approximately 5 minutes and add Craisins. Cook
another 5 minutes or until onions are clear.
3. In an extra large work bowl, place bread cubes, add hot vegetables and toss
until well mixed. Slowly add 1 can of chicken broth and toss again. Add black
pepper to taste.
4. Line extra large baking pan with heavy-duty foil. Spread dressing evenly in
pan and wrap until ready to cook.
5. Cook dressing for about ½ hour at 450 degrees and serve hot.

Note: Dressing can be frozen before it is cooked. Sometimes I freeze ½ of dressing
and eat the other ½.

*Notes from Jesse.  My Mom chops everything in the food processor.  It's so much faster.  Also, I added a little more chicken broth (about 2 cans total) than what my mom says to add.  I used 15 oz bags of the cubed bread, because that's all I could find.  It actually worked out better with a little more cubed bread.  I think my mom's vegetable to bread ratio is a little off.  And one more thing, I like to cook mine longer than 30 minutes.  I like it really crunchy on top.  That is a personal preference. 


So there you have it.

xoxo

j

Tuesday, December 6, 2011

Gingerbread Houses for Dummies

I am not a good gingerbread house maker.  I have made them a total of two times ever.  So if you are experienced in gingerbread house making, you will not find this post useful.  But if you are like me, I have a few helpful tips.

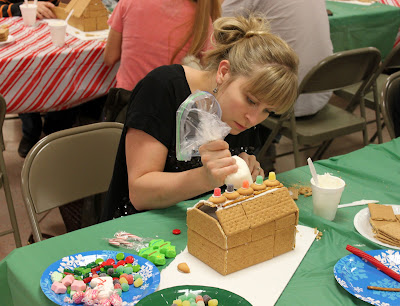
We had a group activity with Levi's classmates at HBS last weekend, making gingerbread houses.  They had a pretty brilliant idea, which is my first and most exciting tip.  The people in charge went to Dunkin Donuts and got a bunch of the to-go boxes.  That is what we used as our foundation!


This idea made the house building a breeze.  I think that is important.  I am the kind of person that would spend forever building the house, and by the time i'm done, I've lost all my steam for decorating it.  You will need to manipulate the box to your liking.  I tucked in the handles. Other people found really creative ways to get the box how they wanted it.
Don't be afraid to cut the graham crackers with a knife.  I used what was there, which was a plastic butter knife.  It worked just fine.  I also shaved down jagged edges.  I could have done a much better job, as you'll see in the pictures.
Toppings are everything.  Don't underestimate the power of cute candy.  


With that in mind, try to remember that less is more.  It's so easy to get carried away with decorating when you have so much cute candy in front of you.  I'm not really sure how to stop.  I wish I had a good tip for that.

Last tip is to pipe the icing on.  I think that one is a no-brainer.  I'm pretty sure that most people know to do that, but thought i'd put it in just in case.

I'm sure there are a billion icing recipe's out there, and if anyone has a great one please pass it on!  Here's an icing recipe from a friend.  I've never actually made it, but she says that it's reliable.  

Icing

3 egg whites, room temp.
1 lb. powdered sugar
1 tsp. vanilla
1/2 tsp. cream of tartar
Combine all ingredients and beat for 7 to 10 minutes. Spread as desired.

Well, I guess it's time to reveal the gingerbread house that I made.  I'm actually really embarrassed by it.  Here I am, giving these tips, while I've made a pretty sad looking house.  


Ok, I doubt anyone fell for that one.  Here it is:


Yet, another lie.  If only.  This is the look I will go for next year.  I grabbed these pictures off of the internet.  Is that legal?  Ok, here's the REAL thing:


Ugh.  I really don't like looking at it.  It doesn't even have a chimney!   But I can tell you one thing . . . that foundation is a strong one!  I could throw this baby off of my balcony and it would still be intact.  I will try to do better next year.  At least now I know how to make these.  It can only go up from there right?

xoxo

j

Monday, November 28, 2011

Baking Club

I am participating in this online baking club.  If anyone is interesting in joining, here is the link to the info about it.  My friend, Amanda, is hosting it.  There are only 2 more days to sign up, so hurry!  It's going to be a lot of fun.  Anyone can join.

http://girlplusfood.blogspot.com/p/bake-52.html

Here is the book we're using:

The America's Test Kitchen Family Baking Book

I love her blog.  I cook things off of there all the time.  I especially love her Chocolate Chip Muffins, Cornbread, Caramel Pecan Pumpkin Pie, and Strawberry Shakes.  The next recipe I plan on trying is these Pumpkin Cream Cheese Muffins.  They look amazing.

xoxo

j

Monday, November 14, 2011

12 + thoughts on frosting

Whoa, I just realized that I have 12 followers!  I need to start blogging again!  I don't want to disappoint my 12 faithful followers.  Truth is, I still cook and bake.  I just got lazy with taking pictures, transferring them to my computer, writing a post, and getting pictures onto the blog.  Can you blame me?  I am seriously impressed with all you faithful bloggers out there.  I don't know how you can create awesome things, AND take the time to blog about them, especially since most of you are Moms with kids.  Hey, that's a good blog post idea...maybe one of you can write about the behind the scenes.  I would like to read that.  You could write a guest post on my blog, for my 12 followers of course!  Any takers? Rachel? Amanda?  Pioneer Woman?  Yeah right, you don't read my blog even though I talk about you all the time.

So here's my latest venture...


And here's what I have to say about it.  I made these for a friend's baby blessing reception.  I started out using the Perfect Cupcake Frosting from Our Best Bites (love that cookbook and blog).  Well, it turns out that I'm not a fan.  It was a lot of work and only frosted 10 cupcakes.  It also tasted way too buttery, and trust me... that's big for me to say.  I love butter.  I have lived a week without milk and eggs, but when I ran out of butter I made a B line for the store.

 So, I won't be making that recipe again.  I ended up frosting the rest of the cupcakes with canned frosting... I know.  It wasn't so bad.  It was a lemon flavored kind.  I whipped it up in the Kitchen Aid for a few minutes.  It got nice and fluffy.  I actually think that it looked a bit better than the other frosting too.

So i'm still on the search for the perfect frosting.  In the end, none of that really mattered anyways.  The cupcakes ended up falling up-side down off of the table.  My cute 3 year old neighbor may have had something to do with that.  It was pretty funny.  I wish I would have gotten an after picture!

xoxo

j

p.s. Just in case anyone is interested, I've added the recipe for cooking a live lobster to the lobster post.   It's at the very bottom of the post.
UPDATE!!!
What the ...  I only have 11 followers now!?!  I guess they aren't so faithful after all.

Friday, October 28, 2011

I'm back with a lobster attack!

The other day I was in Harvard Square, enjoying the lovely weather.  I randomly decided to stop by the farmers market.  I came away from the market with a bag of delicious chocolate nuts and a live lobster.  Yes, you read that right... A LIVE LOBSTER!!!  And boy do I have a story for you!  It started out as an exciting, spontaneous purchase.  The lady that sold it to me was a fisherman's wife.  He caught the lobster, and she sold them.  The lobster I bought had only been caught the day before.  She showed me a picture of their boat and everything!  It was a true New England experience.

I made several mistakes following my purchase.  First, I called my Mom.  Thinking she would be proud of me, I excitedly told her what I had just bought.  Then she asked me, "So are you going to cook it, or take it to the bay to set it free?"  That's when the panic set in.  For the rest of my walk home I was agonizing over that question.  Was I actually going to kill a lobster, and then eat it???

My second mistake was that I kept my purchase a surprise for Levi.  Once again, I really anticipated that Levi would love the idea that I bought a lobster on a whim for dinner.  Well, when I came home and showed him my big surprise he was less than impressed.  He said, "I'm not touching that".  My lobster enthusiasm was completely deflated and the guilty conscience kicked in to full gear.

My third mistake was this.


We became friends with the lobster.  We named him Poseidon.
p.s.  I mopped my floor before and after Poseidon touched it...just in case you were wondering
That night we went out for pizza.  The next 24 hours were an absolute hell as I stressed about what to do with the thing.  It was awful.  He was in an insulated bag that was kept in my refrigerator (that's what the lobster lady told me to do if we didn't cook it that night).  All night and the following day I couldn't stop thinking about the fact that there was a live lobster sitting in my fridge.  I felt sick to my stomach.  Twice when I opened my fridge I could hear it squirming around in the bag.  It was horrifying!!!  I consequently avoided opening my fridge for most of the day.


So here I was, about 24 hours after I bought my lobster, still trying to figure out what to do... be the real chef that I want to be, or return the lobster back to the sea.  As soon as Levi got home from school I asked him what we should do, and he said that we should cook it.  He made it clear that I needed to finish what I started.  He was right, and I knew it.  

Everything looks great and under control in the picture right?  It was... and then directly after it was taken all hell broke loose.    
I am not joking when I tell you that my lobster got an adrenaline rush.  He knew what was about to happen to him (Levi read about this online and apparently it's a normal thing.  Of course Levi conveniently forgot to warn me about that until it was too late).  I had never seen our lobster so lively up to that point.  He was slapping his tail up and down so hard that he whipped my hand and I dropped him on the counter.  It was wiggling all 8 legs like crazy, trying to get away.  It scared the heck out of me!!!  This lobster was ready to pounce.  I seriously thought it was going to jump off of the counter and attack me.  I could have sworn that it was hissing at me.  So all the while, I was screaming at the top of my lungs!  Levi was yelling at me to pick it up and throw it in the pot.  Poor little Woods was sitting on the kitchen floor bawling because he was so terrified.  So I was screaming, Levi was screaming, and Woods was screaming.  It was total chaos.  My heart is pounding right now just remembering that crazy moment.

Finally I swallowed my fear, picked the lobster up, and threw him into the pot just as fast as I could.  This was proceeded by slamming the lid on as hard as possible.  I did not want this thing jumping out of the pot and attacking me.

Here are some pretty sweet action shots.  It shows the sequence of events perfectly.  Thanks to Levi for being the photographer, and my mentor.

Throwing the lobster into the pot.

I am freaking out in this picture, because the lobster was still moving in the pot!!!!!


I did it!!!  I was about to drop dead at this point, as you can see.  


 It was such a relief to have it over with.  I killed a lobster.  That sounds awful, but it was a huge burden that was lifted off my shoulders.


This is all the meat we got out of it.  Not much...
 We really did eat it and here's the proof.

 It tasted like any normal lobster.

Cooking a live lobster is not for those with weak stomachs.  Not only is cooking it traumatic, but trying to figure out how to eat it is almost just as bad.  As you may have read in a previous post, eating a lobster is disgusting.  There are numerous surprises that you will find inside.  After all is said and done, I am feeling mixed emotions.  I am proud of myself for doing it, but I did have a sick feeling in my stomach for the next two days.  I contemplated becoming a vegetarian for about a day...but I had signed up to bring pulled pork sandwiches to a potluck the following evening.  Now I am just feeling grateful for those who are willing to provide meat for me.  It takes a certain kind of person, and it's not me!  I won't ever cook a live lobster again, not in a million billion years.  But I will say that it was one of the main events of my year.  I will never forget our lobster experience.  It will always be a fun Boston memory to look back on.

Levi and I also decided that we probably won't want to eat lobster ever again.  In the words of my Mom, "We've had our lifetime quota".  

xoxo

j

p.s.  Our lobster pooped all over my kitchen in his crazy rage.  It's hard to see because we have speckled counter tops, but it was every where!  It was slightly disturbing, especially since I still had to eat the thing!  Not the most appetizing way to prepare to eat a lobster.


P.s.s.  You'll notice that I never used the lobster's name, Poseidon, through out the post.  Before we cooked him, It was fun to refer to him as Poseidon.   After I killed him, it was just too sad to call him by his name.

P.s.s.s.  I'm ignoring the fact that I haven't posted on this blog in months.  Let's just pretend that it never happened.

UPDATE!!!

I've had a few people ask me how to cook a live lobster.  Here's my recipe:

Recipe for cooking a live lobster

Boil a full pot of water (salted so that your lobster feels safely at home, before he returns "home")
Throw lobster in
Slam the lid on tight
Run for you life

But seriously, you can just look it up online.  That's what I did.  Good luck!

Friday, April 22, 2011

Homemade Fast Food

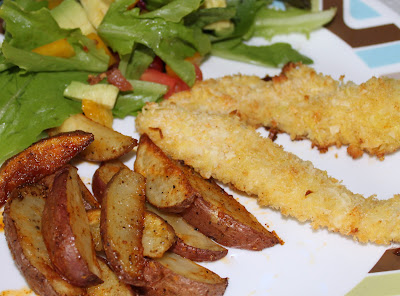
Chicken Fingers and French Fries  Healthy, Tasty, Fabulous.  I never want to eat fast food again after eating this delicious homemade meal.  It's so much better than fast food!  I got both recipes out of my newest cookbook, Our Best Bites.  The authors of this cookbook are fellow Utah Mormon Moms!  I really like what I've made from it so far.  Here's the link to their blog : 


And here's the link to the Crispy Coconut Chicken Fingers: http//www.ourbestbites.com/2009/11/crispy-coconut-chicken-fingers/.  I used less coconut and curry powder than the recipe called for.  In the cookbook there is an apricot sauce recipe to go with the Chicken Fingers.  Here is is:  Whisk together 1 cup apricot-pineapple preserves, 2 tsp soy sauce, 1/2 tsp Dijon mustard and 1/8 tsp curry powder.  I used just apricot preserves.  I definitely recommend this sauce to go with the Chicken Fingers!

Here's the link to the French Fries. http://www.ourbestbites.com/2008/04/oven-steak-fries/ Oh, and I added mustard to the Fry Sauce.  These are superb.

xoxo

j


Wednesday, April 6, 2011

My favorite chicken

A few months ago, I went to Ikea for a free cooking class.  It was really fun, and I learned a lot.  They gave us gift bags filled with spices and recipes.  I got this chicken recipe on an Ikea recipe card.  I've made this recipe several times now.   It's basically a garlic and parsley chicken with a hint of lemon.  One of the things that I learned at this class is that parsley is very good for you.  So here's a healthy recipe that is incredibly easy to make.


Jacques Chicken and Parsley

Ingredients

3 boneless, skinless chicken breast halves, cut into 1 to 1 1/2 inch cubes (I like to make the cubes smaller)
2 Tbsp Wondra flour (This flour is finner than regular flour.  I'm guessing that normal flour would work for this recipe too)
1/2 tsp salt
1/2 tsp freshly ground pepper
2 1/2 tbsp good olive oil
1 tbsp chopped garlic
3 tbsp chopped parsley (I use Italian flat leaf parsley)
1 lemon, quartered

Dry the chicken cubes with paper towels, and toss them with the flour, salt, and pepper in a bowl.  Heat the oil in a 12 inch skillet until very hot but not smoking, add the chicken cubes, and cook in one layer, turning occasionally, for about 3 1/2 minutes.  Meanwhile, combine the garlic and parsley in a small bowl to make a persillade (whatever that means).  Add the persillade to the skillet, and saute for another minute, shaking the pan occasionally to coat the chicken with the mixture.  To serve, divide among four plates, add a wedge of lemon to each plate, and serve within the next 15 minutes.  I also like to add a little lemon zest to the chicken when I add the garlic and parsley.

From Jacques Pepin's cookbook, Fast food My Way.

xoxo

j

Wednesday, March 30, 2011

Gettin Dirty in the Kitchen

  One Sunday afternoon, my sister (Rachel) decided to take some fun, silly photo's of herself in her kitchen.  Here's her pics from that: http://familyeverafter.blogspot.com/2011/03/self-portraits-in-my-kitchen.html.  Cute huh! From there, she decided to make a contest out of it.  As soon as I saw her post, I was dying over how creative and adorable she was.  I immediately knew that I wanted to take her challenge, and be a participant in her contest.  I started to come up with ideas as I was trying to fall asleep that night.  I spent an entire sleepless night thinking of funny things that I could do.  Every time I thought of something new, I would just lay awake laughing to myself.  In the end, I decided that I wanted my photo shoot to be entitled, Gettin Dirty in the Kitchen, and that is exactly what I did. You won't believe some of the crazy and silly things that I did.  It was all in the name of love!  Rachel had several participants, and she posted each of their pictures.  Don't forget to read the captions, they are pretty funny.   Here's the link to her blog post contest of the kitchen self portraits: 


It's a really cute blog that has lots of fun things from crafting to cooking to photography and more.   

I also posted some of my kitchen pictures.  After 140 photos, a whole afternoon, and a lot of laughing, I present to you my kitchen photo shoot.

Gettin Dirty in the Kitchen
Told you I was gettin dirty!
Egg vs. me...who will win?
Here we go!


I'm thinking the egg won.

 Notice the shirt change?  Yeah, my husband told me that my armpits were really hairy...how embarrassing!!! I actually had to crack FOUR eggs on my head to get the right shot!  It was really funny in the moment.

The next segment is me against the flour.  I've always wanted to do this... I'm glad I finally got the opportunity.


What a mess!  It took me forever to clean the egg and flour out of my hair!  That wraps up the Gettin Dirty in the Kitchen photo shoot.  I knew that I wanted to include my 3 month old son (Woodson) in some of the pictures, so here's a few more kitchen shots:

Slow roasted in the oven for 9 months!

Levi and I were laughing hysterically while taking these pictures in the oven.  The look on Woodson's face was priceless.  No worries, the oven was obviously OFF.

Two of my favorite things combined in one picture...My son, and my cookbooks!  


Enjoy, and feel free to laugh at me.  It won't hurt my feelings.

xoxo

j

Tuesday, March 22, 2011

Diaries of a COOKIEholic


Today I realized that my blog should be called Diaries of a Cookieholic.  I make cookies almost every week!  I guess you could say that I'm a cookie connoisseur.

On Sunday I made a cookie that is a childhood favorite.  I call them Russian Tea Cakes, but they are also known as Mexican Wedding Cookies.  The recipe is straight out of the Betty Crocker Cookbook (a must-have).  This is also an egg-less recipe, for those of you who may have an egg allergy.  I could eat a million of these little babies.  Here's the recipe:

Russian Tea Cakes

Ingredients:
1 cup butter
1/2 cup powdered sugar
1 tsp. vanilla
2 1/4 cups all-purpose flour
3/4 cup finely chopped nuts (I like Walnuts)
1/4 tsp. salt
Powdered sugar

Heat oven to 400 degrees.  Mix butter, 1/2 cup powdered sugar and the vanilla in large bowl.  Stir in flour, nuts and salt until dough holds together.  Shape dough into 1 inch balls.  Place about 1 inch apart on ungreased cookie sheet.  Bake 10 to 12 minutes (I do 10) or until set but not brown.  Immediately remove from cookie sheet to wire rack; cool 5 minutes.  Roll warm cookies in powdered sugar; cool on wire rack 5 minutes.  Roll in powdered sugar again.  Makes about 40 cookies.

Enjoy!

xoxo

j

Tuesday, March 15, 2011

St. Patrick's Day Cookies


These cookies are a surprise in your mouth.  Why, because they are lime flavored!  I made these cookies for ward prayer.  It was amusing to watch each person eat the cookie.  They would take a bite, give the cookie a double take (surprised by the lime flavor), shrug, and then finish it.  It's a uniquely delicious green cookie.  It's an original recipe from my Mom.  Here it is!


Mom’s Own St. Patrick Day Cookies

Ingredients:

2 cups of butter (I like salted)
2 6oz packages of lime flavored jello (save out ½ of one box for glaze)
2 cups powdered sugar , plus 3 cups for glaze
4 cups flour
2 eggs
Green Glaze (below)
Green sprinkles

Instructions:

Heat oven to 375 degrees.
Reserve ½ of a package of dry gelatin for the glaze.
Mix remaining gelatin, butter, powdered sugar and eggs until light and fluffy.
Stir in flour until mixed.
Using cookie scoop, arrange cookies approximately 2 inches apart on
ungreased cookie sheet. Flatten cookie dough with the back of a flat spatula,
periodically coating the spatula with flour to prevent the dough from sticking
to the spatula.
6. Bake until set but not brown, 8 to 10 minutes. Cool slightly; remove from
cookie sheet. Cool completely.
7. Prepare Green Glaze. Put waxed paper strips on counter. Dip tops of cookies
into glaze and set out on waxed paper to dry. Add sprinkles while the tops
are slightly wet. (If the tops are too wet the sprinkles melt into the cookies, if
the tops are too dry, the sprinkles won’t stick).

Green Glaze:

1. Mix reserves gelatin and ½ cup boiling water.
2. Let stand 5 minutes.
3. Stir in 3 cups of powdered sugar until smooth and of desired consistency.

Option: Use different flavored jello for a non-St Patrick’s experience.

My cookies did turn out a little flatter than usual.  My Mom thinks that maybe the butter should be slightly decreased.  I have not tried the recipe with less butter, but you may want to try that.


Enjoy!

xoxo

j